
or.... what happens when you pick a pound of basil leaves and dry them?
Home-dried herbs are less expensive than the commercial variety and taste better too. Fresh-dried herbs have a more intense flavor, brighter color, and are less likely to have been irradiated.
Most herbs are extremely easy to grow and hard to kill, kind of like weeds. They grow well in the garden or in a group of pots arranged on a sunny windowsill. Delicious fresh, herbs are also easy to dry and store. Homegrown and dried herbs also make great gifts.
Learn the basics in this brief guide to drying and storing herbs as well as info on sun-drying or air-drying as we follow an entire pound of fresh basil leaves through the picking, washing, and drying process.
What Herbs Can You Dry?
Why, you can dry almost any of them! The leaves generally have the best flavor because they contain the most amount of essential oils. Some herbs have thin stalks that can be crumbled when dried, but stalks generally don’t add much flavor (dill being the exception here). They can add an unpleasantly crunchy taste though and become lodged in your gums if not ground finely enough.
Seeds are also great candidates for drying: dill, sunflower, coriander, fennel, and mustard are some of the most familiar. Less often, roots are dried as well, as with dandelion, horseradish, and sassafras.
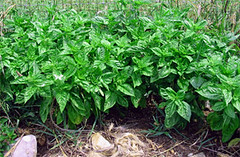
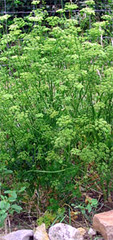 For best flavor, pick the leaves right before the plant flowers. Don't be shy about picking heavily and breaking off some of the longest stalks. The plants respond quickly to harvest by putting out new, tender growth – more leaves for you to dry later! See what happens to parsley that goes to seed. There's very little greenery left on the plants for harvest.
Regular harvest can keep plants from flowering and extend the amount of time you have to harvest for drying and enjoy them fresh.
Herb Drying Techniques
Without a doubt, a food dehydrator is the quickest and most efficient way to dry foods. Types of dehydrators run the gamut from $30 tabletop models found at discount stores to large models costing hundreds. Solar-powered dehydrators are also available for purchase or can be built by hand.
However, drying herbs doesn’t take any special appliances. If you have sunlight, relatively low humidity, and an oven, you can dry your garden bounty quickly and easily.
Air-drying is a traditional method where the stalks are tied and hung upside down to dry. Sometimes, they're placed in a paper bag to catch the leaves and seeds. It's possible to air-dry herbs indoors or out. Outdoors, you need a sheltered, shady spot and low humidity. Indoors, you need a spot where they herbs won't be disturbed and good air circulation.
Sun-drying works well, when there's relatively low humidity, sunlight, and a light breeze. If the outside temperature is too high or there's too much humidity, your leaves may cook or even rot before they're well-dried. Too much sunlight and heat can turn the leaves brown and tasteless.
Small batches of herbs can also be dried in a microwave oven or in a traditional oven set on a very low temperature.
I use a combination of sun drying and oven drying. It seems to be the best of both worlds. The sun-drying stage takes advantage of free energy to do the initial wilting. Then, an oven set to "Warm" temperature quickly removes the rest of the moisture and maintains good color and taste.
Drying One Pound of Basil Leaves
 Step 1: Pick the basil. Yes, it takes a lot of basil to make one pound! The basil shown here was harvested from several beds of basil – a total of about 30 plants. I picked it in the morning, just after the dew dried, rinsed it, and patted it dry using kitchen towels.
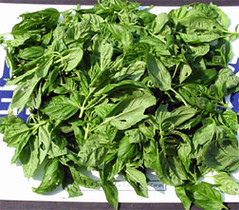
 Step 2: Remove the leaves from the stalks. Some sturdier herbs like parsley, rosemary, and thyme can be easily dried on the stalks, but basil leaves and stems contain so much more moisture that it's much quicker to dry just the leaves and discard the stems. You can't eat them anyway.
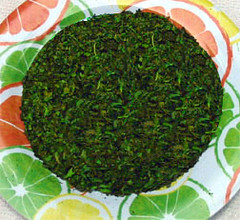
Step 3: Place in the sun for several hours. Here, I used window screens raised up about 10 inches off the surface of the deck. This mitigates the heat rising up off the deck and lets air circulate above and below the leaves. The leaves are arranged individually on one screen, with another on top to keep the leaves from blowing away or being damaged by insects.
Step 4: Complete the drying process in the oven. After 3 hours in the sun, the basil leaves are quite wilted and much smaller! Remove them from the screens and arrange on cookie sheets. Heat the oven to the lowest setting – about 125 degrees is ideal – and then turn it off! Place the sheets with the basil leaves in the warm oven and leave undisturbed (don't turn the oven back on) at least several hours. Overnight is better.
Here is is before the sun takes over:
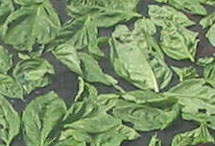
And here it is after 3 hours in the sun!

This process is complete when the whole leaf is dry. Don't try to speed it up by increasing the oven temperature. You'll get dried out, tasteless, colorless herbs. The process takes time, but it's worth the wait to get a high-quality result.
Step 5: Crumble leaves and store. The leaves should be completely dry before you do this. Crush the dried leaves by rubbing them between your hands over a plate or bowl. Then, store them in an airtight container until ready to use or give away.
The herbs will keep better and retain their color and flavor longer if you keep them in the freezer. To make cooking more convenient, keep a small jar out in your kitchen and replenish it from the large freezer jar as needed.
 And look at the dried result from our one pound of leaves! About 2/3 cup dried basil.
But what wonderful basil it is! You won't believe the difference in flavor when you compare it to the expensive jars found in grocery stores.
And because the herbs are fresh, you can use less than you would otherwise, but still get a big burst of flavor.


Love your tips on drying herbs. Healthy and a great way to save money.
Thanks
This is my first time drying basil. It sounds like a great tip. Can’t wait for the finished product. Can you tell me about how long you can keep the finished product in either the freezer on in the cabinet?
Thanks a bunch!
Elizabeth, I keep most of ours in a jar in the freezer. I have some oregano in there now that I dried in the summer of 2007, and it still tastes great. Our basil never lasts that long – mainly because we eat it more quickly.
The downside of freezer storage is that it’s not as convenient has having it next to your stove, so you might not use it as often. Some cooks keep a small jar out and handy, then refill it as needed from the freezer stock. Herbs lose quality quickly when you keep them close to the heat of the stove. If there’s not not room in your freezer, at least keep them in a cool, dry place that’s out of direct sunlight.
Good luck with drying! We have two full quart jars of dried basil and almost that much parsley in our freezer this year. Yum!
Thanks for the info on drying basil. My husband just made me a set of drying screens and I will try your method. I have lots of other herbs, will all leafy ones dry in similar method.